By Keith Fenton
Suggested Sequence
Select timber for the project (Wet wood takes a stain better? Personal choice would be Silver Birch, Sycamore or Ash with as many knots, burrs, branch wood insertions as
possible).
Turn the item to a finished condition as dry as possible. (Leave mounted on the lathe for ease of movement and access)
Sand timber to a good 180 grit finish (with the lathe moving slowly if required) (Don’t waste time going any finer at this stage)
Apply base coat of Spirit Stain – Colour one (Personal preference is Chestnut Spirit Stain with the lathe stationary, applying the stain with a cloth, wearing gloves. Dry this first coat either by waiting or with a hot air gun / hair dryer etc and sand back well with 180 / 240 grit.
In order to accommodate subsequent colours sand this at least 50% away. (With the lathe moving slowly if required)
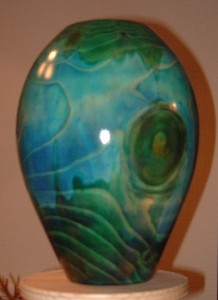
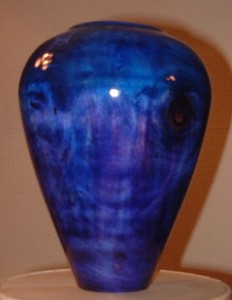
Colour Sequence I like: (bearing in mind I’m colour blind)
Blue, Purple, Yellow
Purple, Red, Yellow
Purple, Blue, Green
Apply 2nd coat of Spirit Stain – Colour two
Sand back well with 240 / 320 grit. In order to accommodate subsequent colours sand this 50% – 75% away. (With the lathe moving slowly if required)
Apply 3rd coat of Spirit Stain – Colour three
Sand back well with 320 / 400 grit. Sand this 50% – 75% away. (Initially with the lathe moving slowly if required and then by hand with the lathe stationary)
Apply any subsequent colours as before allowing each to dry fully between colours, sand back as far as personal preference allows with 320 / 400 grit.
Once final colours are achieved sand well by hand with 400 / 600 grit, with the lathe stationary.
THE ENTIRE PROJECT MUST NOW BE VERY DRY TO PROCEED
Apply sanding sealer finish to the slowly revolving item on the lathe and allow to dry. (Personal preference is for Chestnut Acrylic spray sanding sealer, water
based liquid is fine but the consistency is thick as supplied and needs thinning down well. Liquid version appears to take far more rubbing back
and seems harder to get a smooth finish on the surface) Cellulose appears to pull the colours out of the wood.
Allow to dry. Sand surface by hand with 600 grit, lathe stationary.
Apply a thorough coat of Chestnut Acrylic Gloss, to the slowly revolving item on the lathe, not too much and not to little is difficult to achieve but essential for a high gloss finished result. Several suitable light coats are preferable to one heavy one. Sand back by hand with 600 grit between coats. Three or four coats may be required.
Allow the item to dry thoroughly and if required burnish with cream and / or buff with a revolving cotton pad, before finishing with wax.
Problems?
Q – Colours blend and make a dark bland mess.
– A Allow each colour to dry fully before applying a further coat on top.
Q – Spray gloss finish isn’t good enough with a speckled "orange peel" effect on the surface.
– A Rub back with 400 grit and start again. Problem caused by insufficient spray finish being applied.
Q – Spray gloss finish runs and hangs in swags or runs across the gloss surface.
– A Rub back affected areas only, with 400 grit and re-spray.
Q – Colours are solid and are mainly one colour without a vivid and varied flared effect.
– A Timber selection is poor and timber density is so uniform as to provide little contrast in absorption rates of the stain? – A Base or subsequent colours have not been sanded back far enough, suggest you remove 50% – 75% of each colour to allow the contrasts to come through.
Q – Surface finish under the gloss finish appears to discolour and become a dirty mess.
– A Wood is still damp and gloss finish will not allow the moisture to escape, causing the gloss to "bloom". Sand back to timber surface, allow to dry and start again!